
Archive for December, 2014
My daughter Veronica shares her design for a wooden gumball machine. Her build is based on an old design that I had originally built for shop class when I was in high school. I no longer have the original plans so my daughter measured my old candy machine and made up new drawings that use off-the-shelf stock red oak lumber that required far less cutting and produces a much easier to build candy machine. She also uses common Mason jars for the top which you can purchase in multiple colors.
In this video she explains everything upfront and then covers the build in detail. After the video I will have photos, material list and a PDF of Veronic’s hand drawn plans.
Materials for one – (PDF plans):
3.5” x 0.75” red oak stock 7” long for top and bottom bases
2.5” x 0.75” red oak stock 5.5” long for uprights
0.75” x 0.75” red oak stock 8” long for candy pull
5/16” dowel 1” long for candy pull stop
3/16” dowel 1” long to connect wooden door knob
wooden cabinet door knob
Two #4 x 5/8” flat head Phillips screws
One quart Mason jar with ring lid
Make your GE G-35 LED Christmas lights fully programmable and controlled from your iPhone. This hack is very much like the commercial LumenPlay product but allows full custom programmable control of colors, patterns, timing and locking.
Below is a 4 min demo of my new programmed Christmas light patterns.
You can do this hack yourself by following the below instructions. If you don’t want to hack this together yourself you can still buy a similar product called LumenPlay, you just will not have the full programmable control.
Products needed for this hack:
One or more sets of GE G-35 Color Effects LED Christmas lights. Any bulb count and style will work once you set the bulb count in your sketch. This hack should work with any GE G-35 LED light set but your mileage may vary, no promises from me! If you see 3 wires (5v, ground, data) going to each and every bulb in series with such lights this hack should work.
RFD90101 RFduino 2pc Dev Kit containing:
1 RFD22102 RFduino DIP
1 RFD22121 USB Shield for RFduino
An iPhone or other device that can run the “RFduino Colorwheel” app.
Software needed for this hack:
You have to use Arduino 1.5 IDE or newer. If you currently have the Arduino IDE you must start this setup with the IDE application closed.
If needed, install the ftdi USB driver for your computer system.
You must download the latest RFduino hardware plug-in and libraries from Github. Click the “Download ZIP” button on the right side of this Githup page.
Unzip and copy this downloaded “RFduino” folder into this relative folder on your computer for the current version of the Arduino IDE you are using. I was using arduino-1.5.8 so my relative path was “C:\(???)\arduino-1.5.8\hardware\arduino\RFduino\”
You will need my library:
Download my library and install following arduino.cc standard library add-on instructions.
You will need my sketch:
Download my Christmas program sketch. Unzip and put these in your Arduino sketch folder with your other other Arduino sketches. My relative folder on my PC was “C:\(???)\Documents\Arduino\ToddFun_GE_G35_XmasLights\ToddFun_GE_G35_XmasLights.ino”
To control the RFduino from your iPhone or other device using bluetooth you need to install the “RFduino ColorWheel” app or similar app that can send RGB color codes to the RFduino.
FYI: My library and sketch are based on this Instructables and on MEO’s library but with heavy modifications. Per MEO, his library is based on Mike Tsao’s “sowbug” library which used original code by Paul Martis. DO NOT USE the G35Arduino library or samples sketches from the Instructables posting, they were a good start but will not work for controlling a Christmas light display.
Construction:
Wire up the G-35 lights as noted in my video.
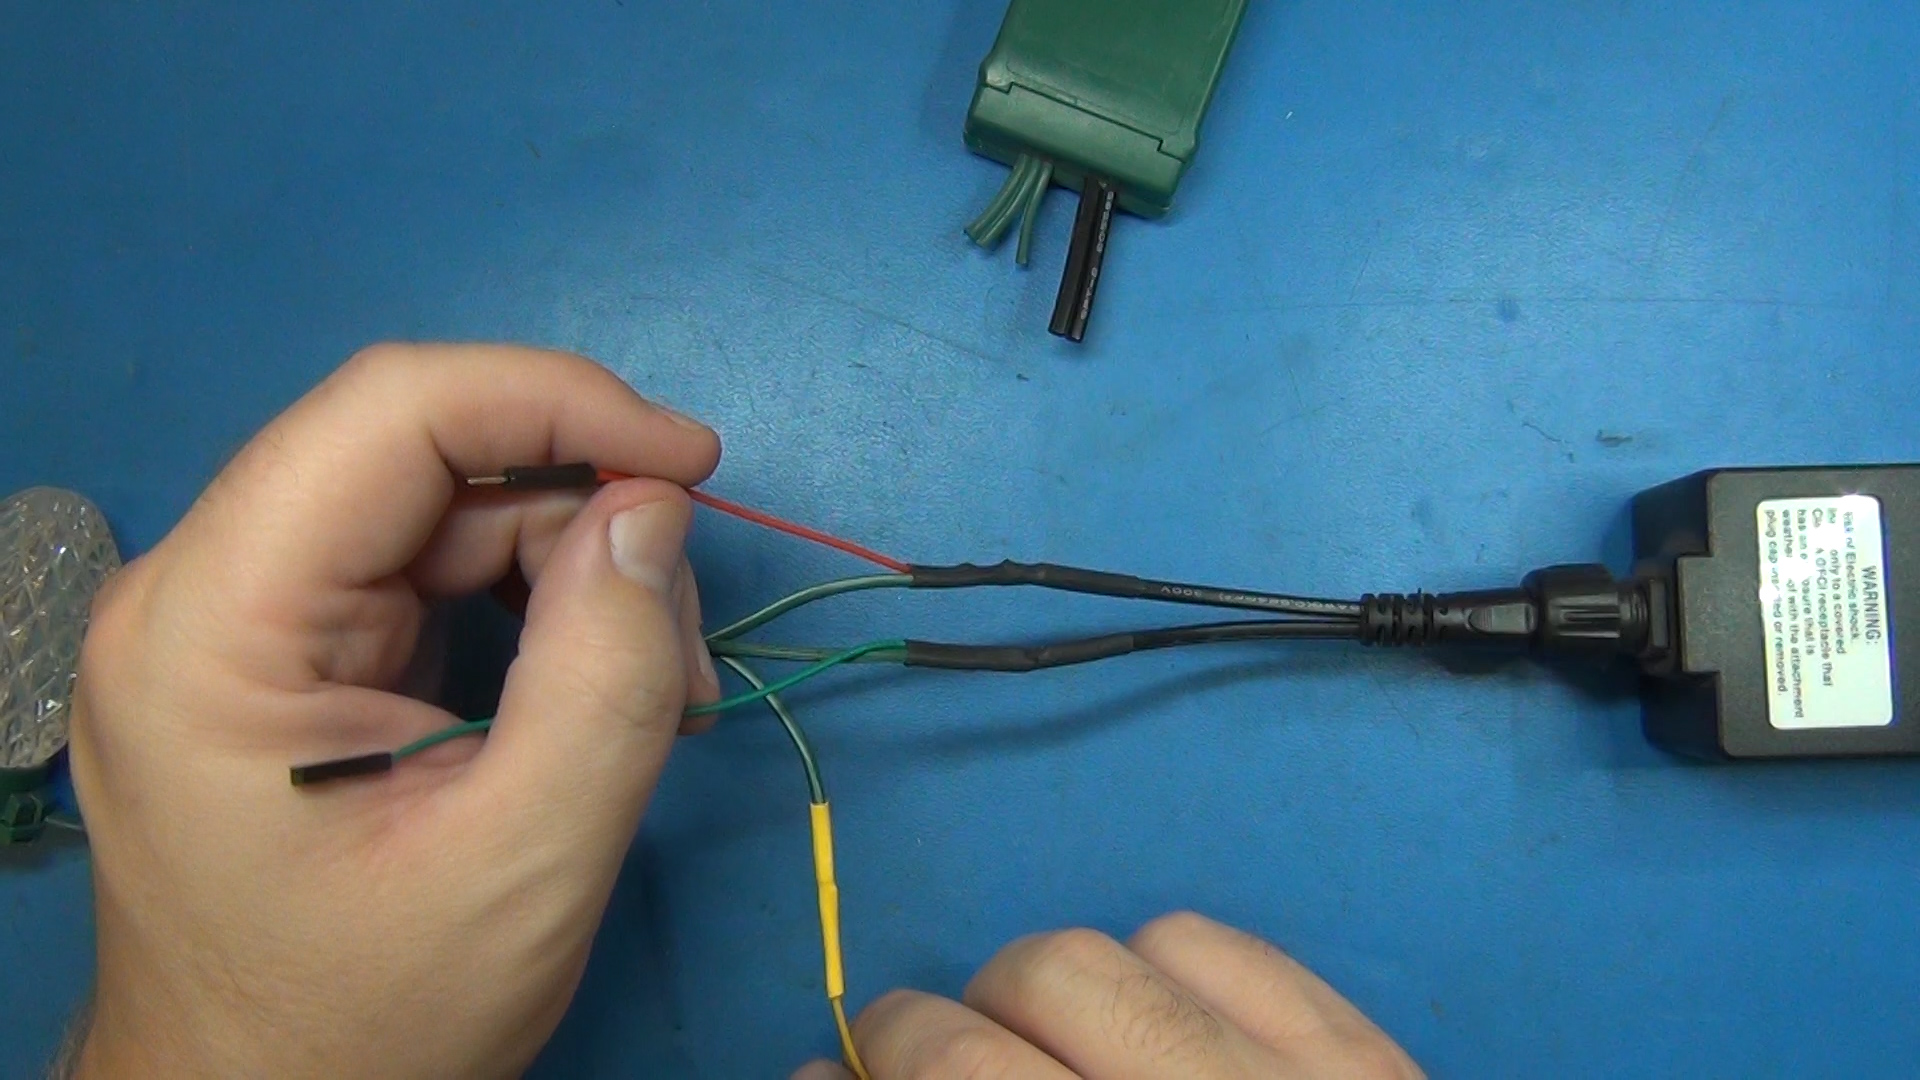
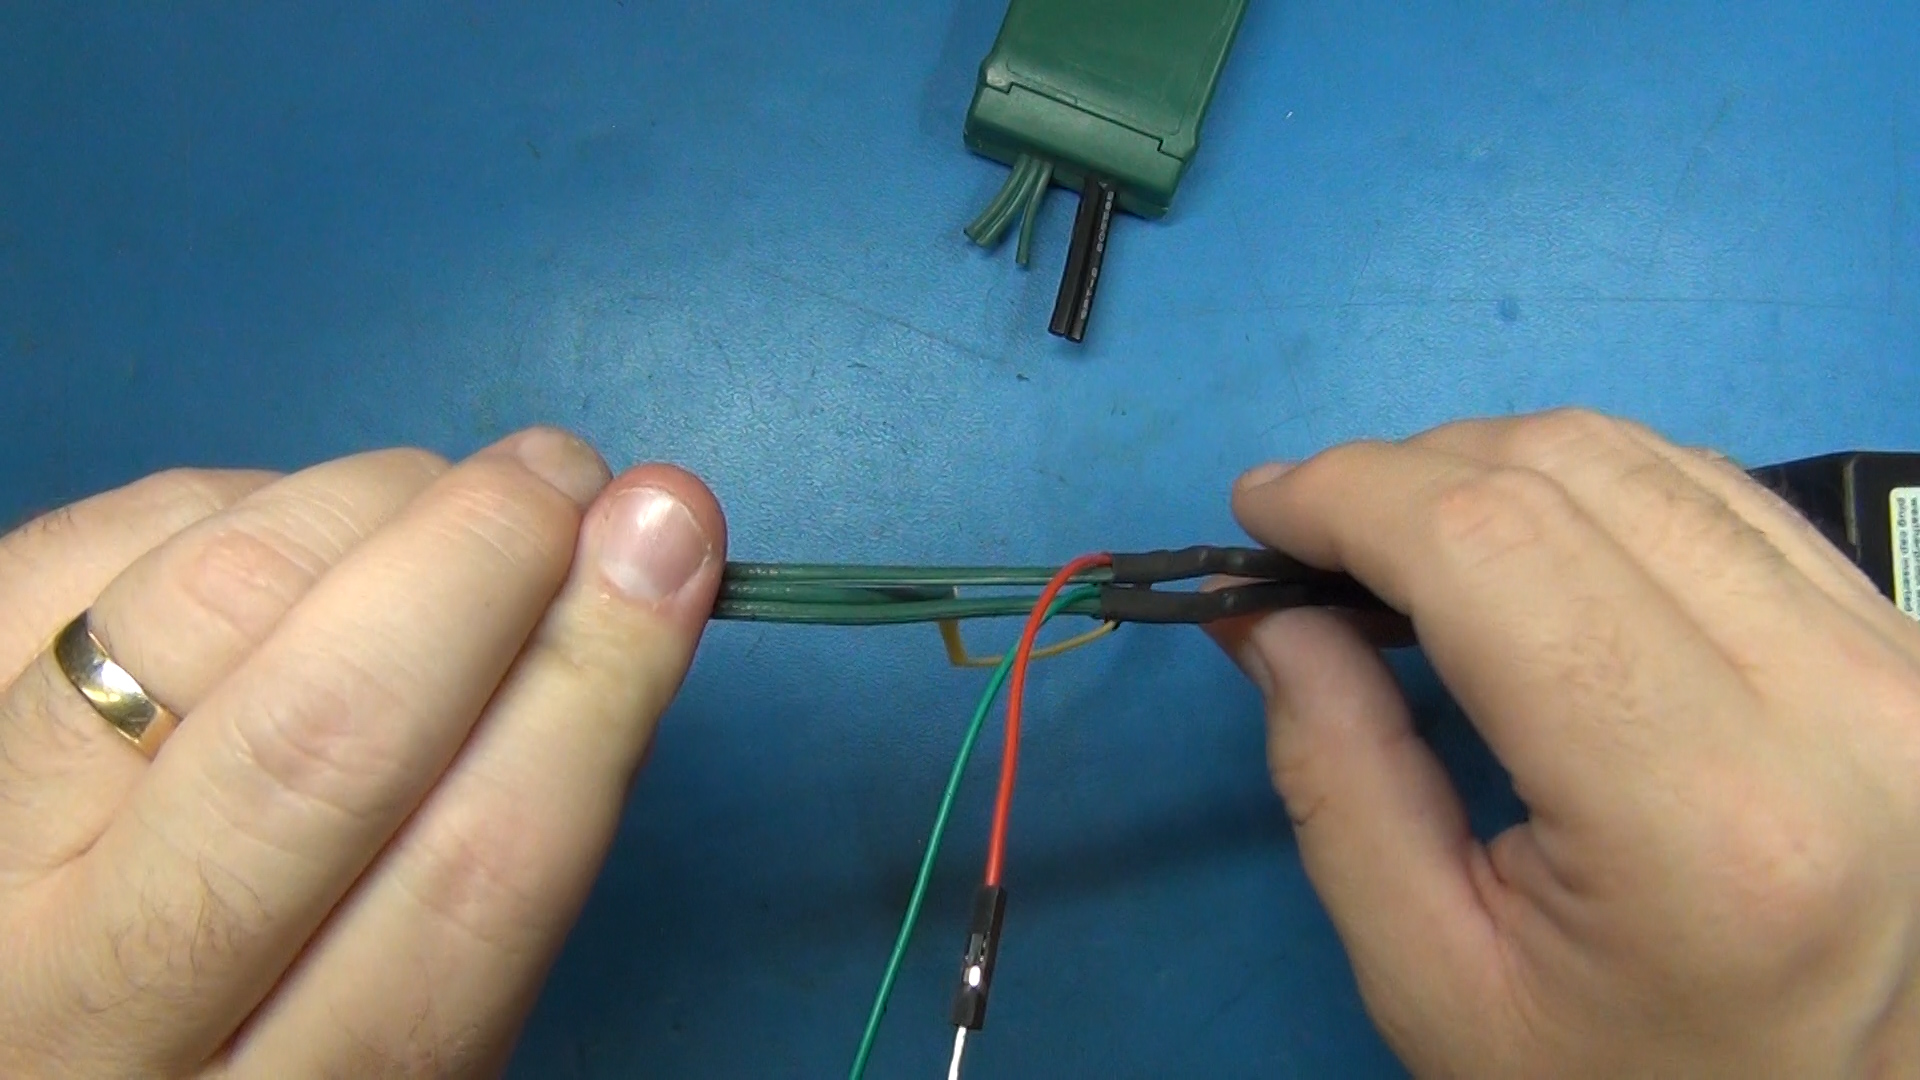
In the video I solder a short jumper directly to the 5v USB connector on the PCB.
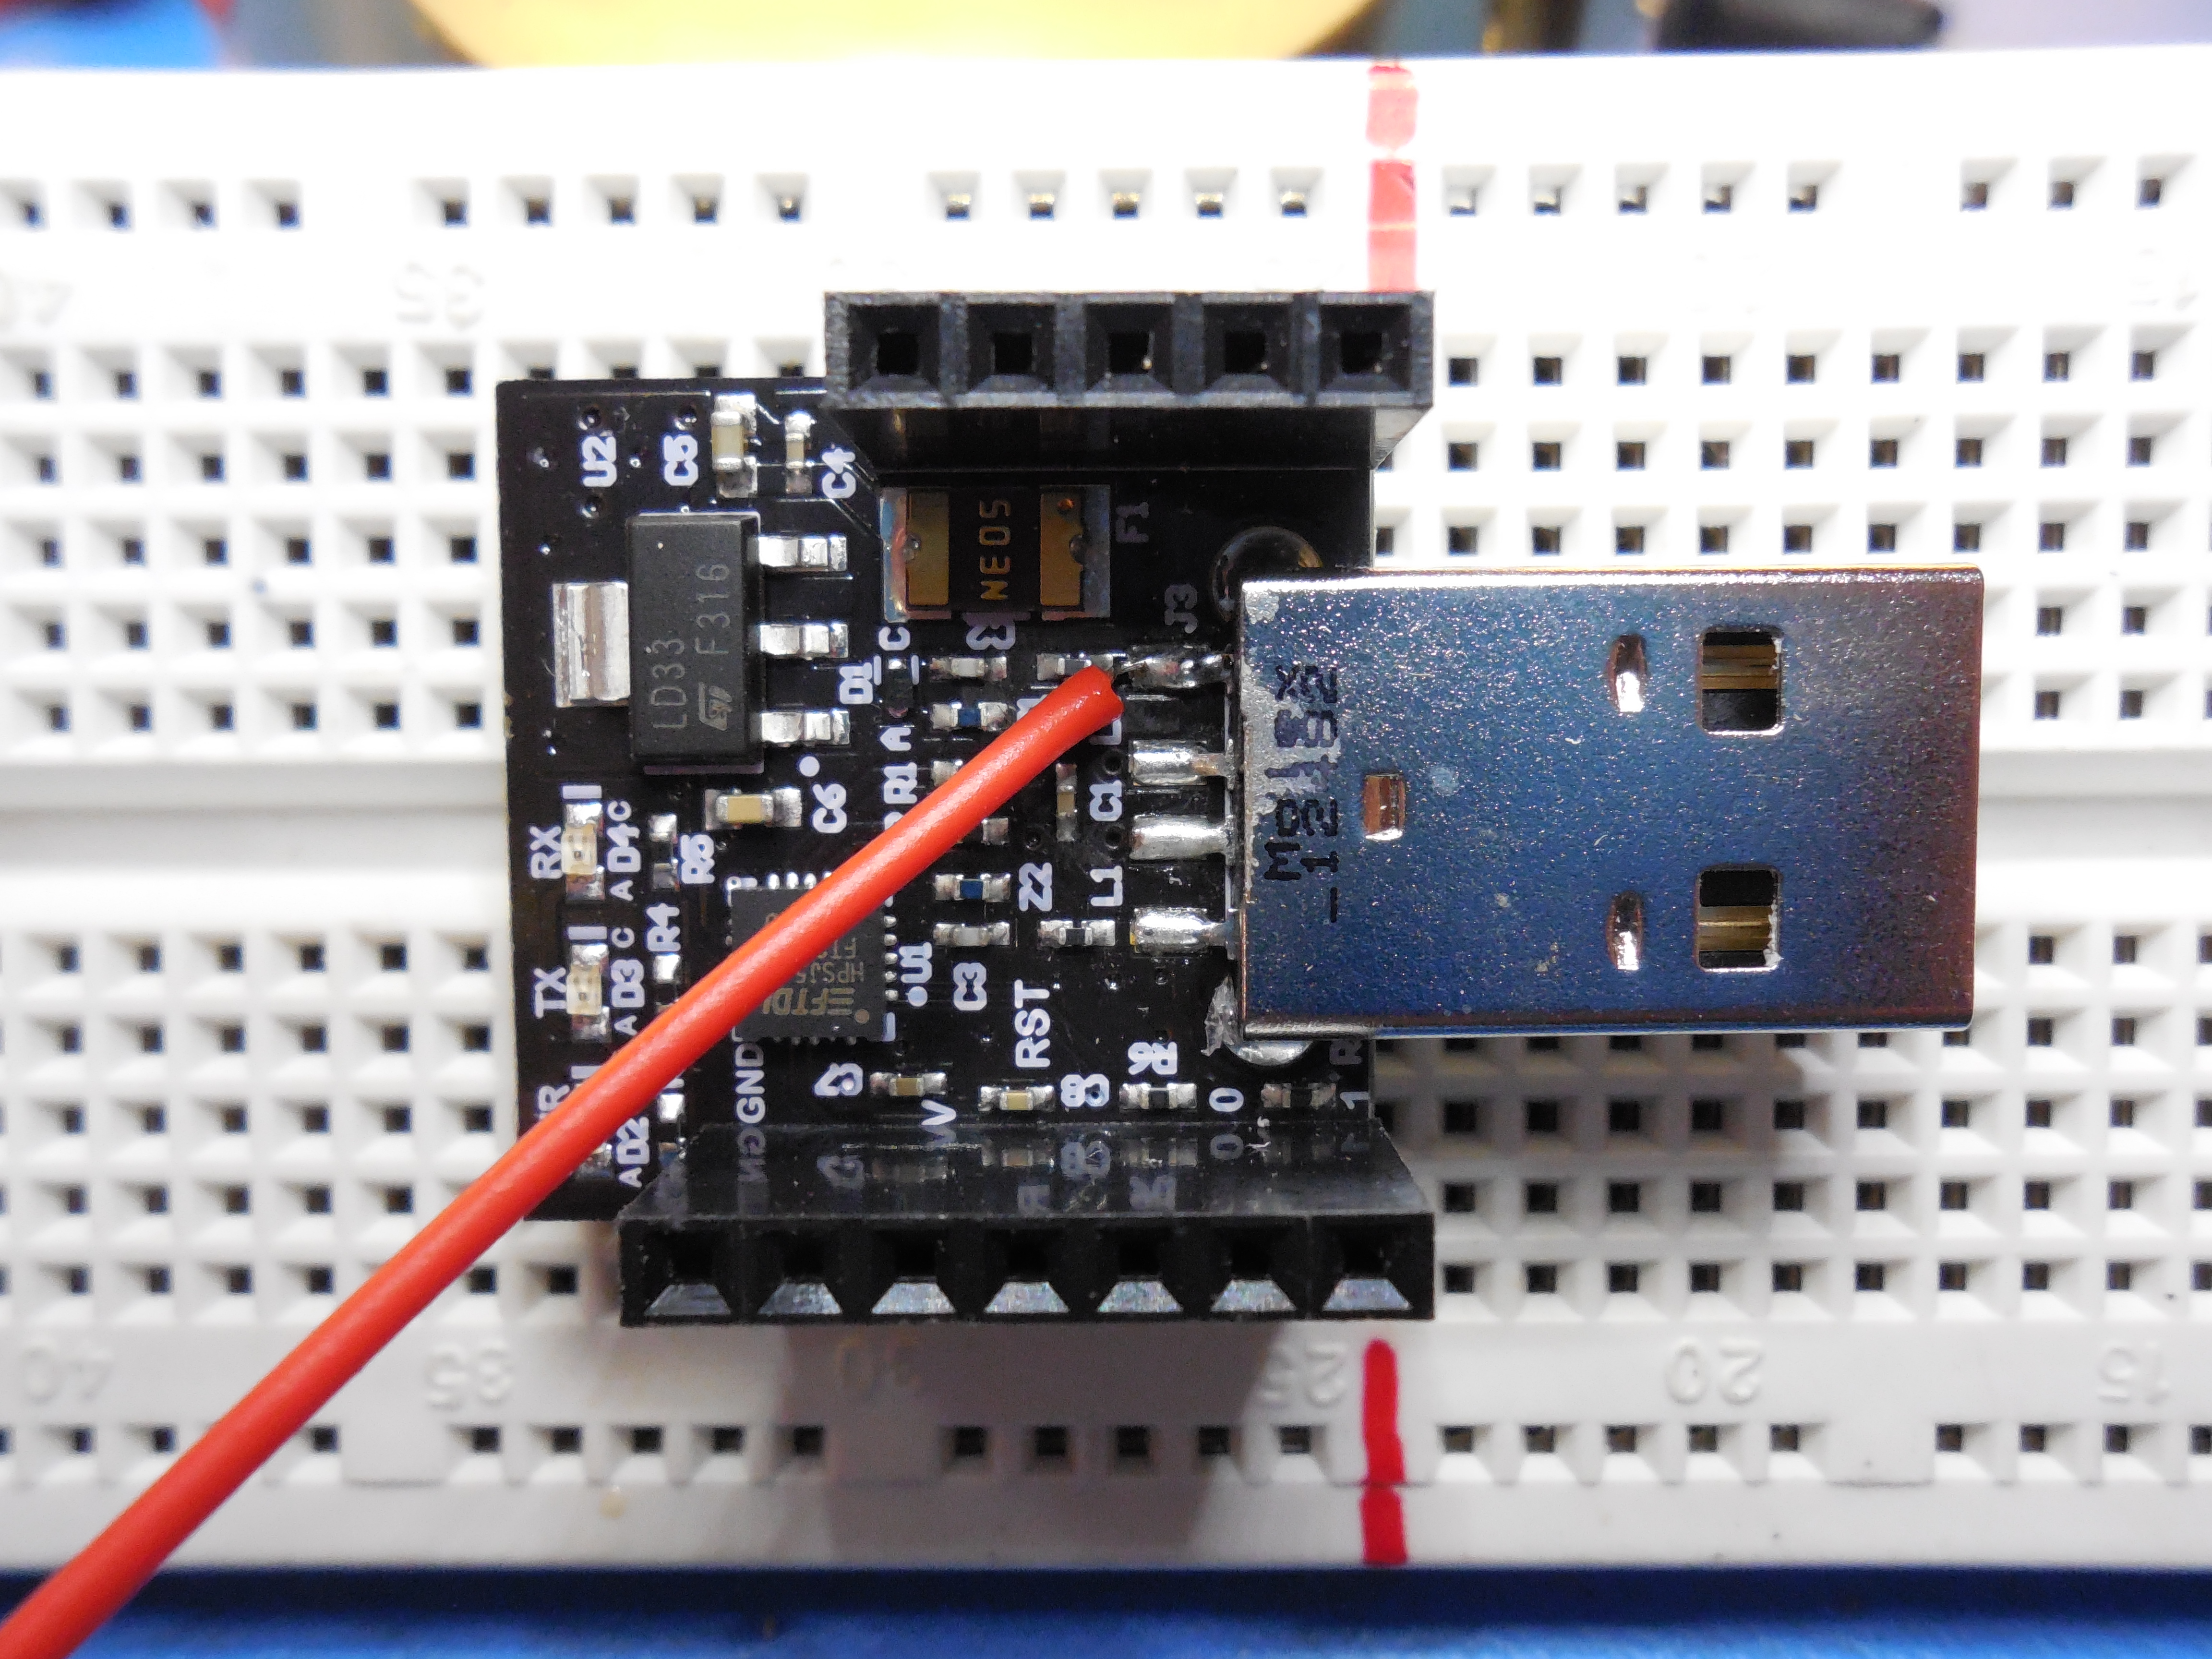
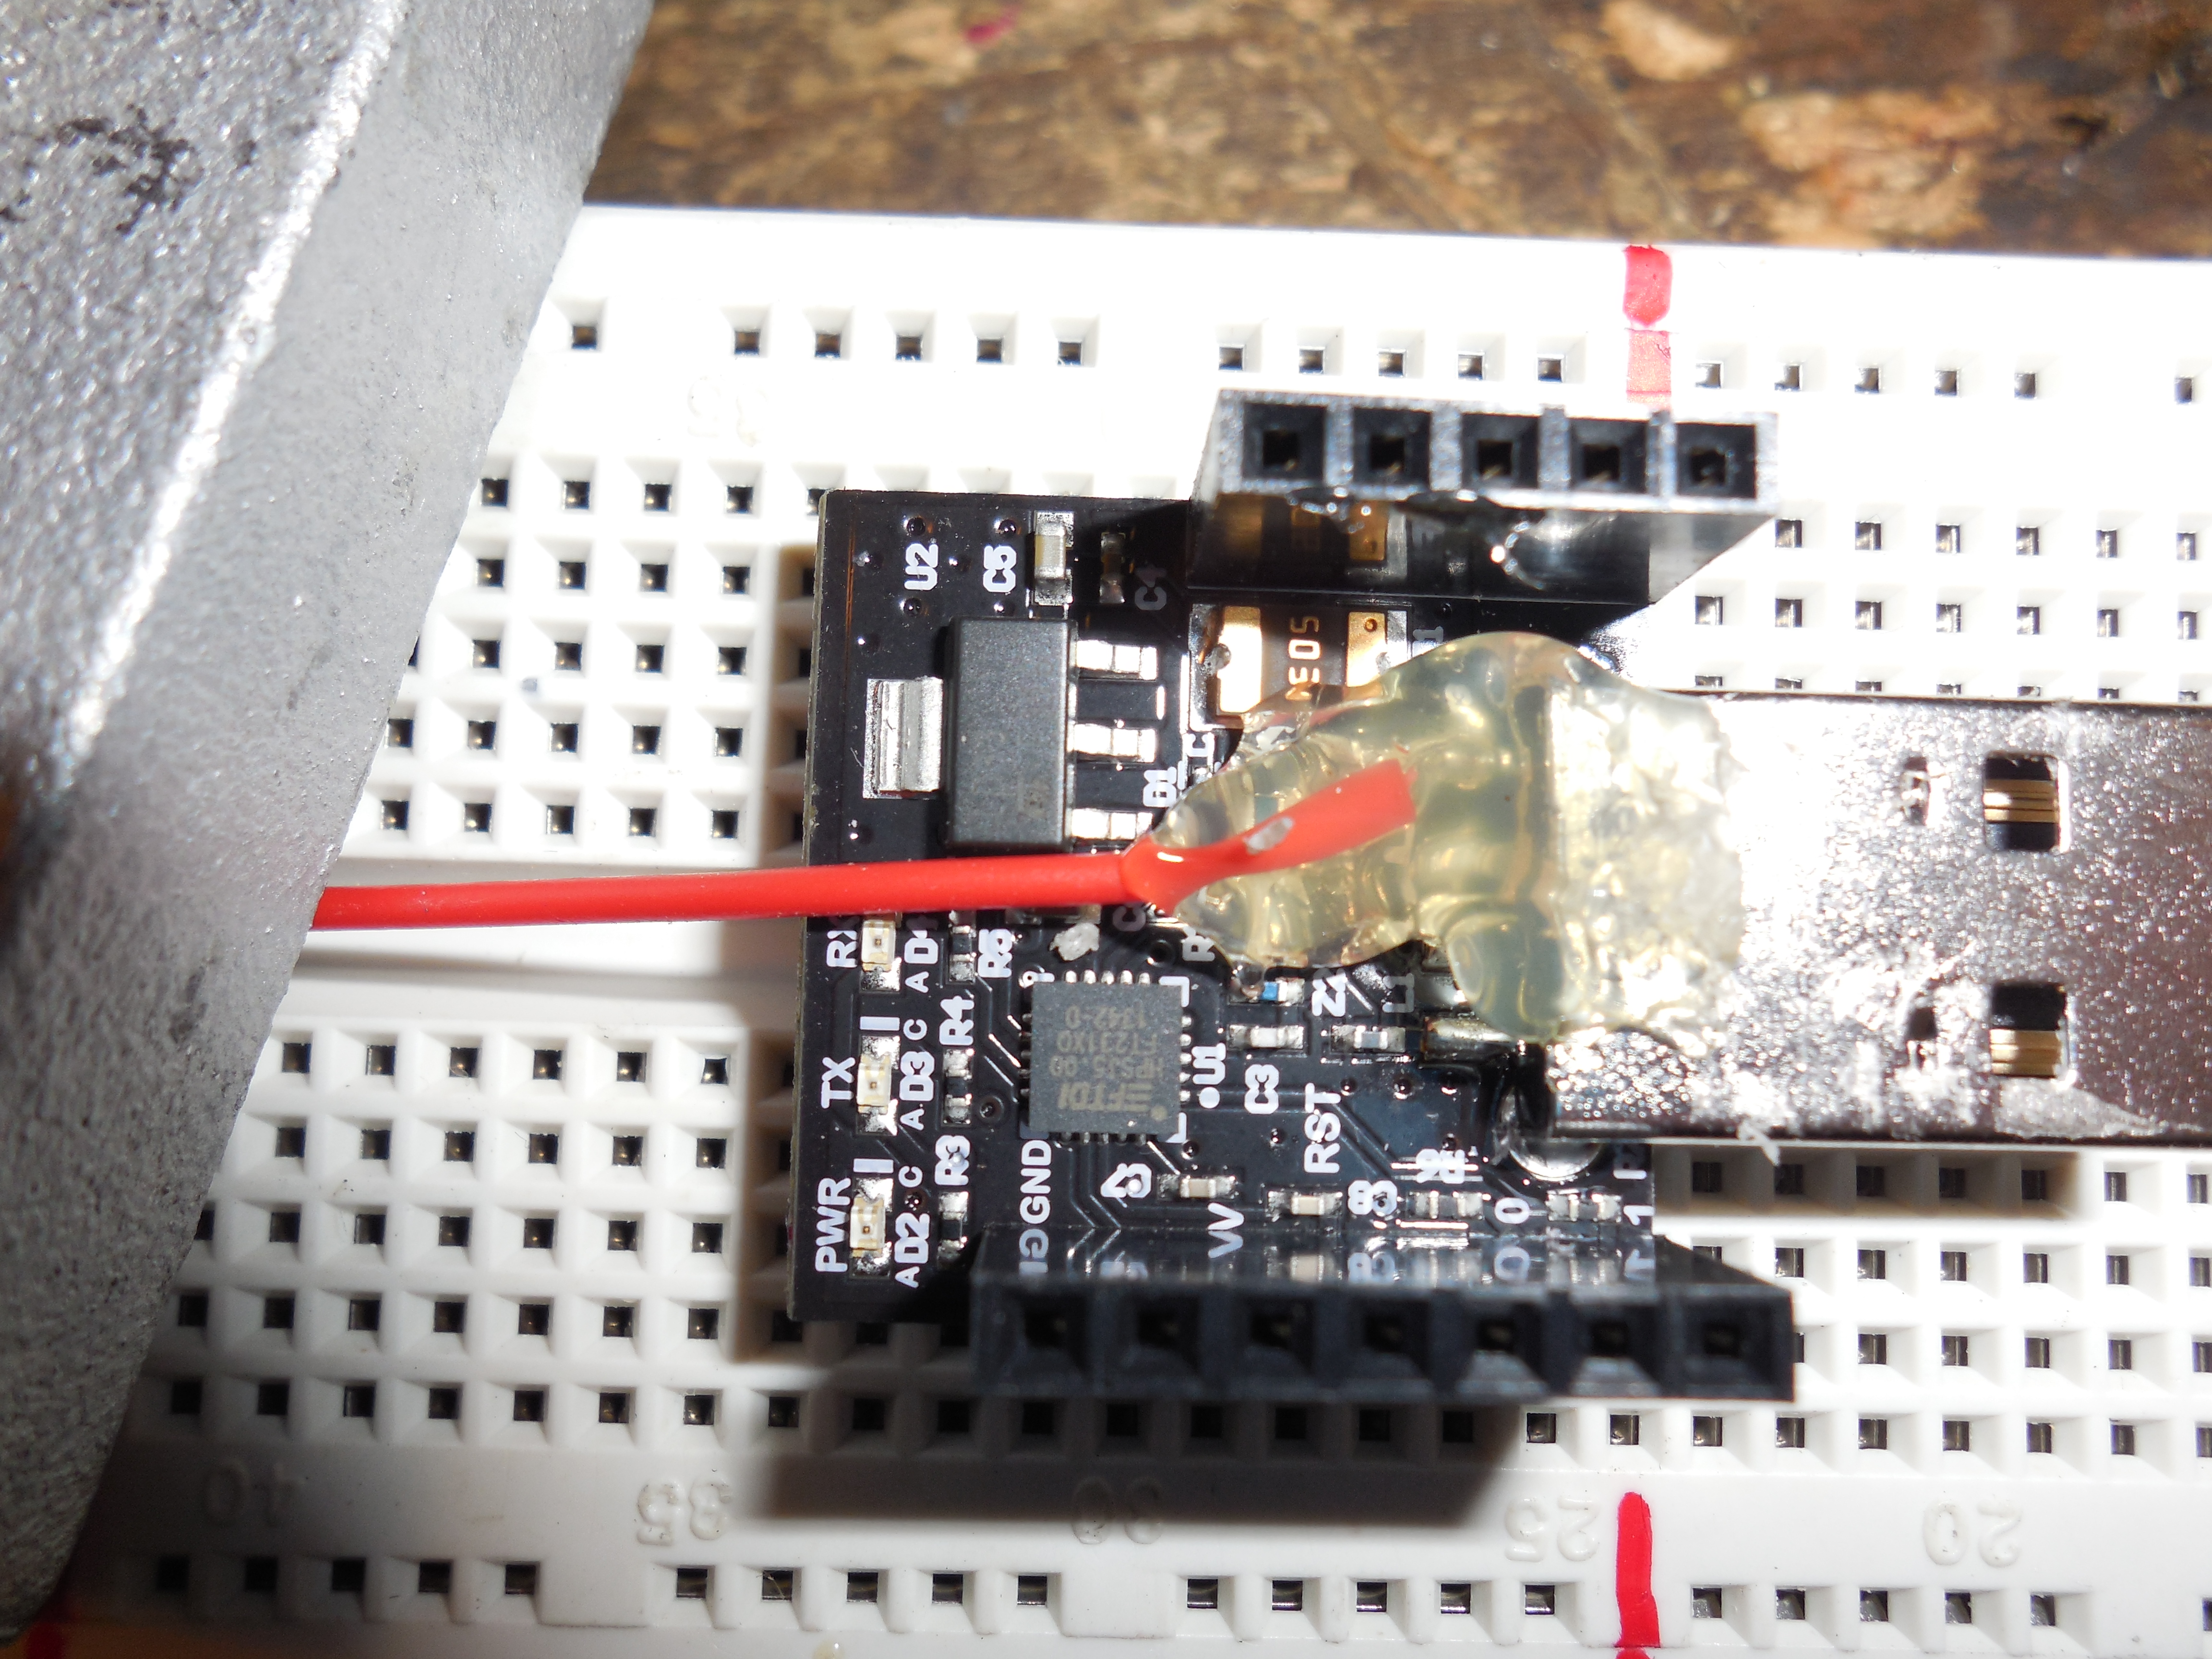
Many will find the fine solder job too delicate. I recommend chopping the female end off a cheap USB extension cable and tying the 5v and ground wires from the chopped USB cable end to the GE G35 power brick’s 5v and ground wires. Then it is much easier to plug in and you only need to connect the one data wire. Using either of these wiring methods you don’t need batteries or a 2nd power brick to power the 3v RFduino because the USB Shield for RFduino has a 5v to 3v regulator and you will be getting 5v for the RFduino from the light’s 5v power supply.
For my Christmas sample sketches you will use ground and GPIO(6) on the RFduino. Any ground point will work.
Programming the RFdunio:
Plug in your RFduino to a USB port on your computer then start up the Arduino IDE 1.5 or newer version. Pick the RFdunio board from the <<Tools/Boards>> menu option. Pick the correct com port the RFduion is connected on from the <<Tools/Port>> menu option.
Open my Christmas sample sketch from the <<File/Sketchbook/ToddFun_GE_G35_XmasLights>> menu option. You may have to edit the sketches before uploading to have the correct light count: #define LIGHT_COUNT (50). Then click the Upload button to upload the sketch to your RFduino. When done programming, remove the RFduino from your computer and connect to the lights as seen in my video.
Using the program:
From your iPhone start the RFdunio ColorWheel app. You DON’T need to pair your iPhone with the RFduino using your iPhone bluetooth settings. If the RFduino is close by, powered up, wired to some GE G-35 lights as noted in my video and running my sample sketch you should see one bluetooth signal named ToddFun. Simply tap the signal displayed to start communicating with the RFduino over the bluetooth connection and change your Christmas light colors and patterns.
I have 25 Christmas patterns programmed which can be selected by setting the r,g,b color sliders to zero then tap the number box for just the “r” slider to bring up your keypad. Enter program numbers (1-25) as the “r” color to switch between the 25 programmed patters. Or just tap any spot on the color wheel to set a fixed color. Entering r,g,b = 0,0,0 starts a demo program cycling one time through all programmed patterns showing each pattern for 10 seconds. When finished with the demo cycle mode it will revert back to the saved cycle duration period and continue cycling.
Users can toggle a lock mode on or off by entering r,g,b = 55,55,55. You can program your own lock code in the sketch so long as the first number is greater than your program count. Upon changing the lock mode all current features are saved including lock mode, cycle duration, cycle mode and current color or pattern. Entering r,g,b = 55,55,56 will save all current features including lock mode, cycle duration, cycle mode and current color or pattern. Entering r,g,b = 55,55,57 initiates program mode. When in program mode the next 3 numbers entered for r,g,b sets the standard cycle time in hours, minutes, seconds accumulative. So if you enter 55,55,57 followed by 0,2,30 you will have a 2 minute and 30 second cycle time. Upon changing the cycle duration the cycle mode is enabled and all current features are saved including lock mode, cycle duration, cycle mode and current color or pattern. Standard cycle mode can be started at any time by entering 255,255,255. If the user enters anything other than 0,0,0 or 255,255,255 and is not entering one of the interactive modes above then cycle mode is cancelled. This mode change is NOT auto saved so a reboot or watchdog reset will revert to the saved settings in micro-controller’s flash page.
You can see my Christmas program pattern picks in “ToddFun_Programs.cpp” library file. (see Readme.md for full list of choices).
1: Christmas Switching – Snoopy’s house in “A Charlie Brown Christmas”
2: Christmas Twinkle – Purple Orange Green
3: Christmas Switching – Red Green
4: Candy Cane Wave
5: Green Phasing
6: Red & Green Chasing
7: Red to Green Dither
8: Red, Green & Blue Chasing
9: Red, White & Green Chasing
10: Red, Green, Blue & Yellow Chasing
11: Red, Cyan, Green, Magenta, Blue & Yellow Chasing
12: White Twinkle
13: Christmas Starlight
14: Cold White Icicle – Slow Pulse
15: Slow Pulse
16: Full Rainbow
17: Full Rainbow Interlaced
18: Autumn Rainbow
19: Colour Wheel Smooth
20: Always Changing
21: Blue Phasing
22: Green to Blue Dither
23: Blue Wave
24: Subtly Changing Pastels
25: Brad Harri Fall Colors
Extra:
There are other patterns in the ToddFun_GE_G35_XmasLights_Library files you could add-in, remove or alter to use for any season. Just change the program listing, ProgramCount and switch-case statement in the “Program.cpp” and “Program.h” files. You could also create and add your own new library pattern program files!
If you also want to share your lights with others in your neighborhood feel free to post my public instruction document (PDF).
LINK to my old Review And Teardown of G35 LED Christmas Lights.
LINK to my old Simple Parallel Sync Hack for the G35 LED Christmas Lights.
Some important links:
http://www.rfduino.com/
http://www.rfduino.com/product/rfd22102-rfduino-dip/
http://www.youtube.com/user/OpenSourceRF/videos
http://www.kickstarter.com/projects/1608192864/rfduino-iphone-bluetooth-40-arduino-compatible-boa
https://github.com/MarkEMarkEMark/G35-MEO-Programs
https://github.com/sowbug/G35Arduino
http://www.digitalmisery.com/2011/11/ge-color-effects-arduino-library/
Thanks for joining.
Have fun!
www.ToddFun.com

Links for Beginners in Electronics }:-)
Archives
- April 2017 (1)
- March 2017 (3)
- December 2016 (1)
- November 2016 (3)
- October 2016 (2)
- September 2016 (2)
- August 2016 (4)
- June 2016 (1)
- May 2016 (6)
- April 2016 (1)
- March 2016 (3)
- February 2016 (4)
- January 2016 (3)
- December 2015 (1)
- November 2015 (5)
- September 2015 (1)
- July 2015 (2)
- June 2015 (6)
- March 2015 (1)
- January 2015 (2)
- December 2014 (2)
- November 2014 (4)
- October 2014 (2)
- May 2014 (1)
- March 2014 (5)
- February 2014 (3)
- January 2014 (1)
- September 2013 (2)
- August 2013 (1)
- July 2013 (4)
- June 2013 (3)
- May 2013 (2)
- April 2013 (1)
- March 2013 (3)
- February 2013 (2)
- January 2013 (2)
- December 2012 (1)
- November 2012 (8)
- October 2012 (5)
- September 2012 (1)
- August 2012 (1)
- July 2012 (2)
- May 2012 (2)
- April 2012 (1)
- March 2012 (3)
- February 2012 (2)
- December 2011 (2)
- November 2011 (4)
- October 2011 (1)
- September 2011 (1)
- August 2011 (2)
- May 2011 (2)
- April 2011 (2)
- March 2011 (2)
- February 2011 (2)
- January 2011 (1)
- December 2010 (2)
- November 2010 (2)
- July 2010 (3)
- June 2010 (2)
- April 2010 (1)
- March 2010 (1)
- February 2010 (2)
- January 2010 (1)
- December 2009 (2)
- October 2009 (4)
- March 2009 (1)
- December 2008 (1)
- November 2008 (1)
- August 2008 (1)
- April 2008 (1)
- March 2008 (1)
- February 2008 (1)
- June 2007 (1)
- November 2005 (1)
- April 2005 (1)