
Archive for October, 2009
I had great fun this Halloween with a silly string shooting spider! My plan was to use an Arduino micro-controller developer board to control my son’s “Teenage Mutant Ninja Turtle” RC car that already shoots silly string. I didn’t get the spider to actually squirt the silly string but when you’re looking at a big black spider and something shoots silly string at you from the same direction it scares you just the same.
I was inspired to do this 4 hour marathon build by a blog posting by Eric on www.Instructables.com. Eric created a silly string shooting pumpkin which was so incredible I just had to build a spider for Halloween that did the same.
My major problem was that once I heard about Eric’s pumpkin I only had a day to get the supplies and about 4 hours of free time to wire-up something, code it and get it out in the front yard before the kids started coming for tricks or treats.
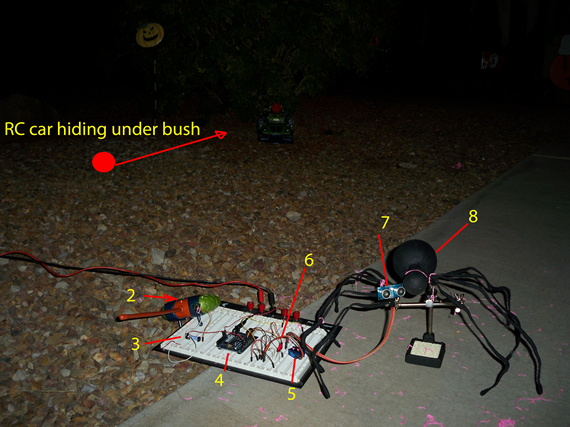
Here is a component breakdown of the final prop.
- The red dot and arrow point to the RC car hiding under a bush.
- 2) RC car remote control.
- 3) Relay used by pin 2 on the Arduino to fire the remote control’s silly string button.
- 4) Arduino board: Duemilanove with ATmega328 Purchased from adafruit.com
- 5) Small blue servo to yank on the spiders leg: TowerPro SG-50.
- 6) Two red LEDs for spider eyes. Not on the spider I know, I ran out of dev time :(
- 7) Parallax Ping))) sonar sensor, held up with helping hands.
- 8 ) Big black spider 8)
I originally wanted the string to shoot from the spider’s behind but I really didn’t have time for that so I hid the RC car in the bushes behind the spider and loaded it with a fresh can of silly string. All I really had to do was get the Arduino to sense somebody getting to close to the spider’s face and then “POW!” fire the silly string using the car’s remote control.
This will be a 7 part blog posting on one project at varying stags of completion that my daughter and I worked on over our fall vacation.
This is part 1 but you can (see parts 2 -6 here)
My daughter wanted to install a POV (persistence of view) device on her bicycle spokes which would allowed her to draw images on her laptop and upload the drawings to be displayed in her spokes as she rode around at night. I found the best kit for this at Adafruit.com called SpokePOV.
Below is a short video of the final assembled and functioning kit with a manga type winking happy face animation my daughter created in Photoshop.
My digital camera set to video record makes the image appear shaky and flashy but this looks a ton better to the human eye. I guess you will just have to take me at my word for now, but later I will try to get better video using a real camcorder.
The seven blog posts I’m planning, starting with this one, will be:
1) Assembling the 3 SpokePOV boards & setup for single sensor triggering
2) Mounting an adjustable magnet on the bike frame for SpokePOV trigger
3) Building bench testing rig for SpokePOV
4) Programming images and setting the SpokePOV board offsets
5) Halloween image uploads with video of SpokePOV in action
6) Troubleshooting and resolving SpokePOV image skew issue
7) Fixing image skew issue using my own creation called “Corrective Raiser image Board” (CRiB)
PART 1) Assembling the 3 SpokePOV boards & setup for single sensor triggering
My 17yr old daughter did all the assembly and photographing. She has been doing PCB board assembling since she was six years old and is one of the best at using a solder iron I have seen, including myself. She only burnt herself once but that was actually my fault because I was holding the iron and pointing at something. So truthfully I burnt her, she didn’t burn herself.
CLICK TO READ ALL —>: (more…)
I just wanted to share a great find.
I read that the stk600 can program and debug any Atmel 8bit and 32bit microcontroller and is basically the USB replacement version of the serial stk500, but the stk600 costs over $200 :(. The great find is that I found a link to a promo at Arrow Electronics for $99. The description of the promo was for a stk600 kit, but when you add it to your cart the description changes to an “STK600 ADAPTER FOR SOIC DEVICE”. I called and they assured me it was the stk600 full starter kit. I ordered it and got it back in July. It was the full kit, nice. :)
(I will included some links for your convenience)
Atmel AVR STK600 is a complete starter kit:
Buy at Arrow with promo $99 (Data sheet)


Links for Beginners in Electronics }:-)
Archives
- April 2017 (1)
- March 2017 (3)
- December 2016 (1)
- November 2016 (3)
- October 2016 (2)
- September 2016 (2)
- August 2016 (4)
- June 2016 (1)
- May 2016 (6)
- April 2016 (1)
- March 2016 (3)
- February 2016 (4)
- January 2016 (3)
- December 2015 (1)
- November 2015 (5)
- September 2015 (1)
- July 2015 (2)
- June 2015 (6)
- March 2015 (1)
- January 2015 (2)
- December 2014 (2)
- November 2014 (4)
- October 2014 (2)
- May 2014 (1)
- March 2014 (5)
- February 2014 (3)
- January 2014 (1)
- September 2013 (2)
- August 2013 (1)
- July 2013 (4)
- June 2013 (3)
- May 2013 (2)
- April 2013 (1)
- March 2013 (3)
- February 2013 (2)
- January 2013 (2)
- December 2012 (1)
- November 2012 (8)
- October 2012 (5)
- September 2012 (1)
- August 2012 (1)
- July 2012 (2)
- May 2012 (2)
- April 2012 (1)
- March 2012 (3)
- February 2012 (2)
- December 2011 (2)
- November 2011 (4)
- October 2011 (1)
- September 2011 (1)
- August 2011 (2)
- May 2011 (2)
- April 2011 (2)
- March 2011 (2)
- February 2011 (2)
- January 2011 (1)
- December 2010 (2)
- November 2010 (2)
- July 2010 (3)
- June 2010 (2)
- April 2010 (1)
- March 2010 (1)
- February 2010 (2)
- January 2010 (1)
- December 2009 (2)
- October 2009 (4)
- March 2009 (1)
- December 2008 (1)
- November 2008 (1)
- August 2008 (1)
- April 2008 (1)
- March 2008 (1)
- February 2008 (1)
- June 2007 (1)
- November 2005 (1)
- April 2005 (1)